I posted a quick how-to on installing the LED tail light, which will soon be followed up on a fender chop ‘how-to.’ Here’s some final pics of my bike (post mods). I also added a HID kit for better night-time driving.
News
I’ve been wanting to upgrade the stock tail light on my Suzuki GSX650F for some time now. I was hoping an upgrade might precede a quick fender chop to rid the bike of that hideous plastic dragging the aesthetics down. The deed has finally been done (both the tail light upgrade AND the fender chop). Here’s how:
UPGRADING THE GSX650F TAIL LIGHT:
Tools involved:
- Metric Hex Keys (Allen keys/wrenches)
- #2 Phillips Screwdriver
- Precision screwdriver (flat or philips) – or other precision tool
- (Optional) [Blade] Cable splices X 2
- Used for integrated turn signals
- Allows for use of stock and integrated signals
- Pliers or Crimpers
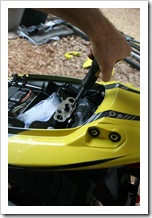 (1) Step one involves removing the seat by unlocking the ‘trunk’. Once it’s off, remove the actual lock mechanism (2 X Philips screws/bolts) so the rear cowling can be separated from the fender without the lock cable tethering it.
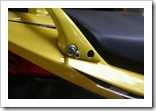 (2) Next, remove the two bolts [on each side] keeping the rear handle attached to the frame. Carefully lift the handle up and set it aside.
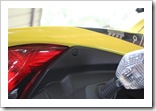 (3) Using a small, precision screwdriver (or other instrument) press in the black push buttons on each of the 4 X plastic rivots holding the fender to the rear cowling. After pushing each ‘button,’ carefully pull out each plastic rivot and set in a safe place.
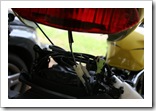 (4) The cowling should be free to remove, though you’ll still need to disconnect the modular electrical connector attached to the brake/tail light when you have access to it.
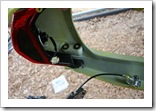 (5) Set the rear cowling on a soft surface (to avoid scratches) and grab a #2 Philips screwdriver to remove the two screws holding the OEM tail light fixture in place. Once removed, set your OEM tail light aside for storage.
(6) Grab your after-market LED tail light and mount it on the rear cowling using the original screws that held your OEM light in place. Take the cowling back over to the bike and connect the modular plug to your after-market light. If you have no intention of wiring your integrated LED turn signals, your finished! Replace the parts in the reverse order described above.
[nggallery id=“1”] After lots of tedious taping for the PCB (Printed Circuit Board) patterns on the fairings + tank, Chad @ WetLixx completed a full re-design of my 2008 GSX650F. It got a great reception from other GSX650F riders (as found here: http://www.gsx650f.biz/custom-paint-job-circuit-tech-look-2008-gsx650f-t1085.html). I’ll grab some more pictures of the bike once I finish hard-wiring my brain to the throttle for more instantaneous response times =)
So what’s been going through the booth at WetLixx Custom Design + Paint? Well, my spanking new 2008 GSX650F just got its first coat of yellow, along with a complimenting metallic finish. The image (left) shows the bike with it’s fairings temporarily mounted for a quick design tape-off. No clear coat has been applied, but you can certainly see the pearl/metallic finish. The conceptual sketches are soon to follow, along with images of the design.
My very talented friend at WetLixx (http://www.wetlixx.com) decided to promote his dynamic art work (on a variety of cars, trucks, motorcycles, golf carts, etc.) by collaborating on a new, custom web showcase for his past and current projects. His primary focus is custom designs and paint jobs on motorcycles (cruiser and sportbike varieties) and golf carts, but he’s established himself as an accomplished artist on all mediums. Be sure to check out his site if you’re in the market for some ‘moving art,’ on your vehicle.
Just returned from a great orientation held in D.C. for departing American students on the CBYX (Congress Bundestag Youth Exchange) program. CIEE (Council on International Educational Exchanges) manages the exchange program, along with the great orientation(s) in D.C. A few pictures of the event have been posted at AverageAnalogs.com, a sister site.