My wife is tiny… 5 ft tiny… Suffice it to say I needed a safe and easy way to load (and unload) my motorcycle without assistance. I researched the expensive solutions from LoadAll and deemed it unnecessarily complicated (with far too many moving parts) for my taste. I also didn’t want to sacrifice my truck cargo space. I decided on the 40″ wide, 8 ft. long Black Widow Ramp from DiscountRamps.
Living
I recently purchased a set of Hotbodies Slash-cut megaphone exhausts (dual) for my 2012 Suzuki Hayabusa. They sound beautiful, and other drivers are actually aware of my presence, unlike riding with the stock cans. The only issue I’ve experienced is the spacing between the kickstand [in the UP position] and the LH (Driver-side) slip-on exhaust. The kickstand essentially hits the exhaust before it’s in the full UP position. This also prevented the kickstand pressure safety switch from recognizing the kickstand was actually UP, resulting in stall-outs shifting into 1st gear from neutral [by design].
Author Note: I wrote this article when I still owned my GSX650F. I’ve since traded-up for a 2007 GSXR600 (and I couldn’t be happier). I might have some images to post with this tutorial, but I’ll post them when/if I can find them. Hopefully the write-up is enough to help… Good luck, modders.
 Prior to my experiences with the Suzuki GSX650F, I was the semi-proud owner of a Hyosung GT250R. I loved the body styling, aggressive riding position, cheap price ($3300 OTD) and gas mileage, but I realized something more powerful was necessary for longer trips (and riding 2-up with the Mrs.). This brought me to my evolving 2008 GSX650F, which has the power, speed, and styling qualities that I was looking for, but still lacked the aggressive riding position I had with the Hyosung.
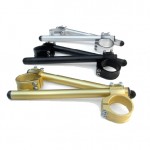
Vortex Racing had the answer to my commuter bar problem: 41mm clip-ons. They’re available in three different colors: silver (aluminum), black, and gold. Additionally, Vortex manufactures after-market bar ends (weighted or unweighted) for their clip-ons — which are certainly necessary after losing the dampers. The install took less than 45 minutes, but I’ll admit I made the mistake of loosening one of the fork bolts too much while lowering the front-end (required for installation on the GSX650F). This inevitably resulted in a lopsided front after the left fork pushed right through the triple-tree clamp. An extra 10 minutes of jacking the bike up and re-adjustment was required. Here’s a concise set of steps used to complete the project:
Per another owner’s request, here are some up-close shots of the chop-job for the 2008 GSX650F … Notice the black bolts (attached to the protruding box shapes beneath the fender) in the second image. These are holding the bracket to the bike ‘trunk.’ There’s a lock washer and nut on the inside of the trunk securing the bracket to the bike.
I did not remove the tail before cutting. I used only a razor knife (with new, clean blades) following a hand-drawn [penciled] line. I did have to change the blade out about half-way through, and I did slice the crap out of a finger, but it was still worth the end-result.
My plate is not actually at an angle, but if you purchased the same tail light w/ the integrated signals and plate light, you don’t need it at an angle. It’s clearly visible at night without bending or angled mounting. Also, you may need some additional hardware (2 X bolts, 2 X nuts, 2 X lock-washers) to re-mount the OEM plate bracket to what’s left of the tail after the chop. Depending on how small your hands are, you might have to remove the tail piece (not the rear fender, just the painted tail) to attach lock-washers and nuts on the inside of the ‘trunk’.